
By Aidan Tuckett
Once, I was the proud owner of an ancient clinker launch, possibly wartime vintage, with an even older petrol inboard. Fairly early on in the relationship it needed a new engine, the inboard being beyond redemption. Money was tight so I traded its remains and £10 for a Seagull Silver Century outboard which ran confidently for three or four minutes before slowing to a gentle stop.
That’s when I began a study of two-stroke mechanics by ordering an owner’s handbook from the makers. I’d hoped for a nautical Haynes manual but instead got a photocopied
pamphlet which opened with:
READ THIS CAREFULLY
BEFORE ANYTHING ELSE.
The world of engine owners is divided into two classes… the vast majority are those who never get any trouble and get heaps of pleasure, whilst the second class is a very small minority which is always in trouble, causing misery to itself and constantly drawing on the kindness and good fellowship of other people for aid and assistance.
Well I certainly aspired towards heaps of pleasure, especially at that age, but I needed a few hints on the way there, maybe a fault-finding chart that led you through options such as dirty fuel, blown gaskets or blocked back passages.
But the chaps who ran British Seagull simply advised a thorough check of the spark plug and then:
But will people do this? No, they won’t…instead, they go on pulling the starting cord for twenty minutes or so, pumping more and more petrol into the engine, filling the plug with oil, and then have to row home, and sometimes (if they’ve got the strength) write a furious letter to the manufacturers. We have no sympathy with these people at all…
Strong words, but of limited value for an engine long past its best. In my case, it gradually dawned that water was supposed to come out of the hole in the cylinder head; some hours later I found the cooling jacket was blocked solid with cooked oil, salt and rust.
Once cleaned out, that engine did passages I wouldn’t dare now, but youth and poverty were powerful motivators.
In fairness to the handbook’s authors, a new engine shouldn’t have much to go wrong beyond the plug. But after a few decades in the open, sediment in the fuel tank plus wear and tear, most engines would need more than a new plug.
In the beginning…
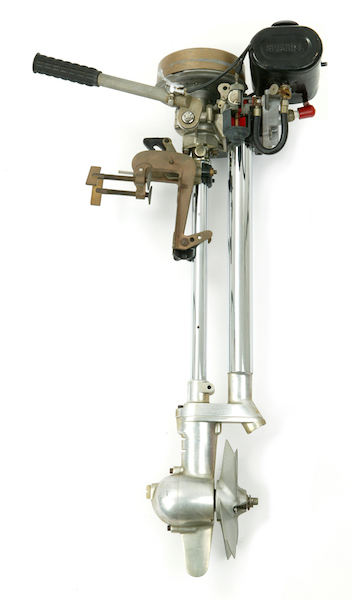
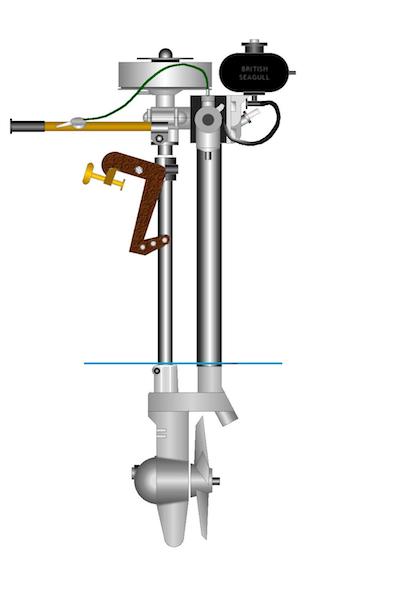
British Seagulls were first built in the 1930s and soon settled into a design that remained fundamentally unchanged for another 50 years. There were two engine blocks: a 64cc block used for the ‘Forty’ models, producing between 1.5 hp and 3 hp, and a 102cc block used for the ‘Century’ models that
developed between 4hp and 6hp. The range of horsepower from just two blocks was due to different carburettor sizes, gear ratios and propeller diameters.
A few engines had neutral gears, although you gained the impression from the maker’s literature they viewed this as a concession to the weak minded, a true sailor having the skill to stop an engine by running the carburettor dry while stemming the tide and picking up a
mooring in one go.
In the early 90s the company gave the engines a complete makeover with recoil starters, CD ignition systems and cowlings. But it was too late – cheaper and quieter imports won the day and production ceased in 1996 when a 5hp Seagull cost around £660, about 30% more than its competitors.
Nevertheless, the basic, no-frills Seagulls have always had the advantage of being easy to repair and – for old engines – relatively reliable.
Because they were designed to power displacement boats by turning a large propeller at slow speeds, bearings could be solid bronze bushings instead of needle rollers. Ignition timing and carburettor settings were fixed. An adjustable spanner and screwdriver were sufficient to carry out most maintenance and mixing oil with the two-stroke fuel ensured every part of the engine and its surrounds would be well coated against corrosion.
The chances are that every Seagull built in the last 50 years is capable of getting you out to sea and back again, which isn’t something I’d try with any other outboard that old. This is the beauty of these engines and with second-hand prices sticking at around £150, they make a great deal for a classic boat.
But they do need a bit of cosseting and, while they’re not complicated, the cost and availability of spares along with the difficulty of stripping down a corroded engine makes a major rebuild unviable for all but true afficionados. So unless you fall into this category, you need to look for an engine in some kind of running order.
 Two sizes, 90 variants
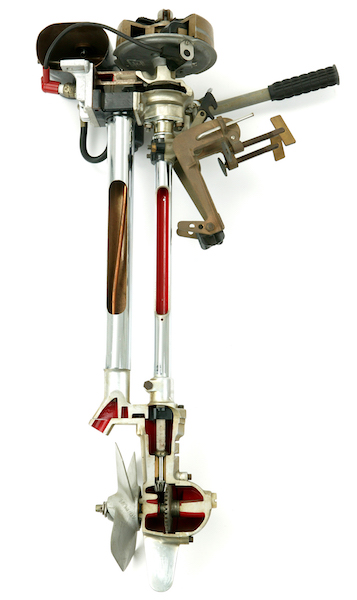
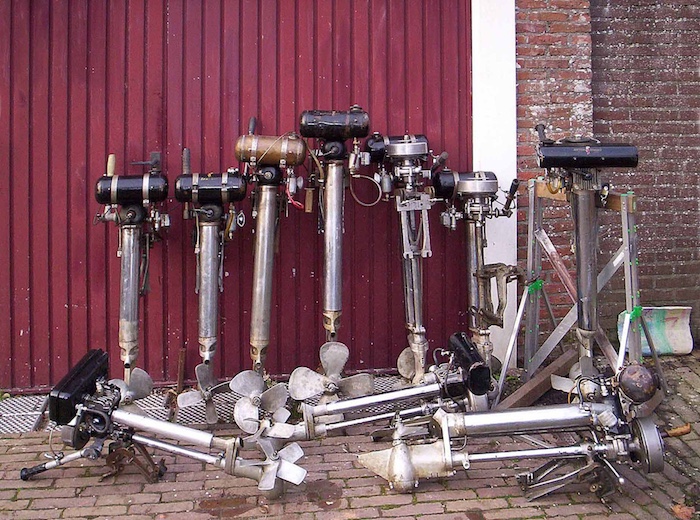
There were about 90 variants of the Seagull built between 1930 and 1995, all based on the two cylinder sizes. Most of those available are either the Century or the Forty series, either direct drive or with a neutral clutch, dating from1946 to 1979.
These engines were usually fitted with Villiers carburettors and Villiers or Wipac contact point ignition systems. They run on a 1:10 fuel mix and use SAE140 oil in their gearbox. After this, engines with recoil starts and astern gears became more common.
Around 1987 the range was rebranded as the QB series. These were marketed at between £350 and £750 when production ceased so may be pricier now, but you’ll do just as well with an older model. Later on Selva Marine took over the brand but their engines bore no resemblance to the originals.
Second-hand sources
There are many sources – Friday Ad papers, the backyard of any proper chandlery or marine engineer and boat jumbles. It’s worth a phone call before making a trip to a private seller to ask when the engine last ran.
Long-term storage indoors is rarely a problem because the high oil mix tends to preserve everything. Ask if the flywheel can be turned by hand. If the seller isn’t sure which model they have, ask how wide the exhaust tube is, Forty models being 35mm/1.5in diameter and the Century 95mm/2.75in. As a guide, dinghies up to 3m (c10ft) and 300kg (660lb) will run with a Forty series engine. Transoms greater than 380mm depth (15in) will need a long-shaft version. Beyond this, boats up to 5.5m (18ft) and 600kg (1300lb) need a Century model. Larger boats can be moved if you can find one of the Century Plus models with a 5-blade 330mm (13in) diameter propeller, but only in calm water.
Depth is fairly critical – if the propeller is too shallow it may churn the surface if weight is forward and water will fail to circulate. Too deep and back pressure from the exhaust will prevent starting. The ideal is to have base of the exhaust tube just below the surface.
Assuming you find one worth looking at, try turning the flywheel to see if there is compression and that the propeller turns at the same time without too many creaks and groans. Look closely for missing parts – if major bits such as the carburettor or mounting bracket are missing or badly damaged, the engine is virtually worthless unless you need it for spares. New parts are available from some suppliers but the cost in relation to another second- hand motor doesn’t make this worthwhile.
Look out for evidence of mechanical butchery such as heavily hammered flywheel dome nuts – signs that the head or crankcase bolts have been shifted with the wrong sized spanners – or damaged slots on the screws that hold the lower leg castings together.
The ideal is to test run the engine on a boat so that you can rev it up and see how it manages under load, which is when problems will manifest themselves. Failing that, start the engine clamped to the inside of a water-filled dustbin or, at a push, you can run it out of the water for up to 30 seconds.
These engines create a lot of exhaust noise but there shouldn’t be any bad mechanical rattles indicating worn bearings, drive shafts or gearboxes, any of which puts an engine into the salvage category.
Testing an engine with old fuel can be difficult because adding two-stroke oil to petrol makes it go stale over time and causes the carburettors to gum up. Likewise a rusted sparkplug is unlikely to deliver much. Often these two problems are combined.
Ultimately, if the flywheel turns smoothly, there is
compression and the engine is complete, it can probably be brought into working order.
Filling up: the mix
All Seagulls made before 1979 run on 1:10, oil to unleaded petrol. Newer ones run on 1:25 although they will not come to any harm on 1:10, especially if they are getting worn. Outboard motor two-stroke oil, grade TCW3, is best for dealing with the relatively low heat of a water cooled two-stroke engine, although motorbike or SAE30 oil will do. Contrary to legend, mixtures involving paraffin and sunflower oil will not. Forty series engines use about one litre of fuel per hour and Century models about 1.5lt, both at ¾ throttle. The usual tank size is 2.2lt, although later engines had an optional long-range 4.5lt tank.
Starting up and running
Start the engine by opening the tap at the base of the fuel tank, give the motor a shake from side to side to encourage fuel tank gas to send petrol into the float chamber and then open the breather screw in the middle of the filler cap. You may still need to hold down the button on the float chamber to fill the carburettor. With the choke flap in and the throttle open, wrap the rope around the flywheel slot and pull hard.
Keep trying up to four or five times. Engines that have been laid up will need a bit of effort to bring the spark back to life. Look out for observers standing behind in case they get whipped by the starting rope – the prayer position is safest in many ways.
If the engine doesn’t start, open the choke and keep trying. After that go with the manufacturer’s advice and clean or change the plug, pulling the engine over a few times with the plug out. After this, practice mindfulness or meditation to regain composure and allow the condensed fuel to evaporate.
Or row for a bit. Once it’s running, there should be a steady stream of water coming out of the hole in the cylinder head at anything over idle speed. Look to see that nothing is working loose, especially the clamps on the mounting bracket. A small boat will always go faster if it is running level, so if you need to sit forward, use a length of 20 mm dowel rod as a tiller extension. A pair of earplugs will help for long passages and bear in mind the human voice will travel farther than a two- stroke engine so avoid sharing personal views on neighbouring vessels with anyone else.
If you can, stop the engine by closing the fuel tap and letting it run on as you drift to a halt otherwise the carburettor will dribble fuel everywhere when the engine is tilted.
Like all two-stroke engines, Seagulls are not the most environmentally friendly motors although you could argue that keeping a 40-year-old machine running is better for the planet than buying a new one that’s unlikely to last more than ten.
You can buy a new needle that will reduce the oil mix from 1:10 to 1:25 which will help reduce fuel pollution, although an older worn engine may need the heavier mix anyway to help seal worn bearings. Bio-degradable two-stroke oils are made by Mercury and Elf, and it should be possible to use bio-fuels (i.e. with 5-10% ethanol).
In January 2007, manufacture of two-stroke out-boards became illegal under EC pollution regulations. However it is legal to use all existing engines until the end of their lives. You should try and avoid letting fuel spill into the water through careless filling or leaking pipes as this does no good at all to water fowl.
That aside, these motors are like a poor man’s steam engine with plenty to tinker and polish, and they are just right for any self-respecting Classic Sailor – a tattooed bicep without the pain. 
Maintenance and repair
On maintenance, starting from the bottom, the gearbox is filled with SAE140 or SAE90 oil, the lighter SAE90 being used on post-1987 engines in a 1:25 fuel mix. It is meant to emulsify with the small amount of water that gets past the seals to form a creamy paste. Remove the nylon filler plug with the back of a knife blade to check the oil is level with the base of the filler hole with the engine vertical.
A gearbox full of water may be due to the rubber oil-seal washer in front of the propeller wearing out or being damaged by fishing line. If not, then a water-filled gearbox is probably due to excessive bearing wear, which is unlikely to be repairable at any reasonable cost.
It can be managed up to a point by more frequent oil changes – you should in any case replace this oil after ten hours running.

Don’t overfill the gearbox – this may cause oil to seep out of the top bearing where it will mix with seawater in the cooling system pump and block the cylinder head passages over time. There is a centrifugal pump directly over the gearbox to pump water from the slots at the front of the lower end up a pipe running within the exhaust tube and into the base of the cylinder head. When running, there should be a smooth flow of cool water from the hole at the right-hand base of the cylinder head.
After every 10 hours running it’s good to either run the engine in a dustbin of fresh water or hold a hose against the cooling water outlet to flush the system through and remove caked salt. A mastic tube nozzle to connect the hose will reduce splashing.
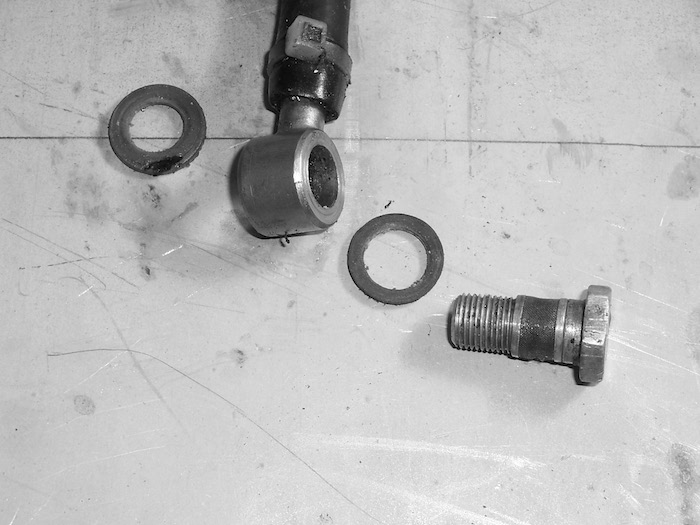
If the engine revs wildly and makes crankshaft death rattles, this is likely to be the square steel spline directly above the gearbox rusting into a round shape and losing its grip on the box section crankshaft. This can be fixed by building up the worn corners with weld metal and grinding it back into a square shape.
If you do have to take apart the gearbox, use a screwdriver with exactly the right size blade for the bolts and use plenty of easing oil. These are stainless screws that go into an aluminium casting – on an old corroded engine the chances of the bolt shearing or a split casting are high so go slowly and use heat (from boiling water or a low blowtorch flame) gently. A screwdriver bit in a brace, ground to exactly the right size for the slot, gives good control.

The last thing to check down the bottom end is the drive spring. This is a fairly soft grade of stainless steel, designed to straighten out and let the engine run free if the propeller jams on weed or rope. Lesser impacts cause the spring to unwind slightly, but as long as it still has a right-angle bend at the outer end, it will remain usable.
Damaged ones can be heated to cherry red with a blow torch, bent back to shape in a vice and then reheated and quenched.
Moving up to the fuel system, frequently run engines should need little attention provided the fuel is clean. Less frequently run engines may suffer from the tendency of elements of two-stroke fuel to evaporate and leave a gummy varnish-like coating in the carburettor’s passageways. Also over time, water will condense out of any air in the fuel tank and collect in the carburettor bowl.
Fuel tanks inside and out
Fuel tanks tend to take a bit of a bashing given their position right at the back. The early brass ones seem to take any amount of abuse without splitting although there is not much that can be done about the dents and knocks. Later steel ones will corrode along the seam. Both can be recoated with smooth black ‘Hammerite’ paint and if you really want to make an impression, you can even buy copies of the original decals with the Seagull logo.
Tanks should be removed and cleaned once a year on regularly used motors – filling an engine from a can inevitably introduces fine particles from corrosion, paint particles and the like. To address this there are two filters; one at the base of the tank and one within the banjo nut that connects the fuel pipe to the carburettor. Both should be cleaned at the same time as the tank.
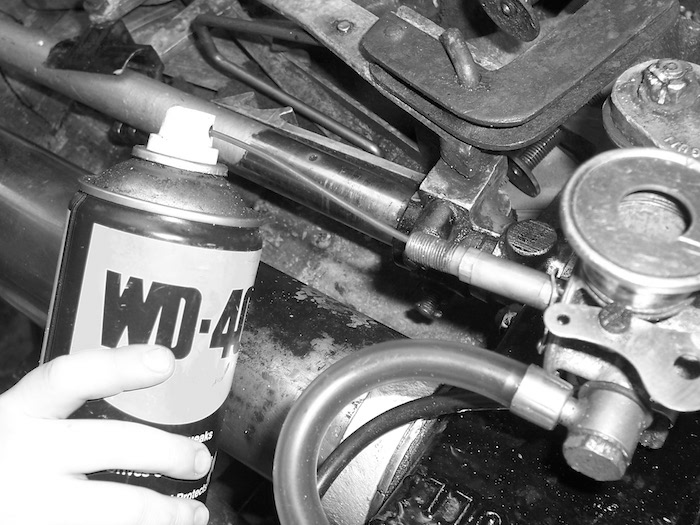
To check and overhaul the carburettor, remove the fuel bowl and float, drain any water and grit from the bowl and shake the float to check it isn’t leaking. Then with a bowl under the engine, check that fuel flows smoothly through the needle valve at the top of the carburettor bowl. The flow should cut off when the float is 6mm beneath the body of the carburettor.
Use compressed air or a WD40 can with the red tube nozzle attached to blow through both the main jet and the slow running jet. The needle should be adjusted so that its adjustment screw is level with the top of the slide. Raising it makes the mixer richer, which is only needed in freezing conditions.
Remove the knurled top of the carburettor slide assembly to check the cable moves smoothly with the throttle lever. This should be well greased. The cable sheath often fractures at the control or carburettor end as the tiller is repeatedly tilted up and can cause the throttle to jam open. To avoid this, some engines have a rubber sleeve to stiffen the cable – if not, the same effect can be achieved by wrapping insulating tape around the ends to increase stiffness.
The slide should touch the base of the jet assembly when the throttle lever is closed. If not, this can be adjusted with the knurled nut at the top of the carburettor assembly. If you suspect a blocked carburettor at sea, don’t risk repairing it on the transom – it’s too easy to drop bits overboard. 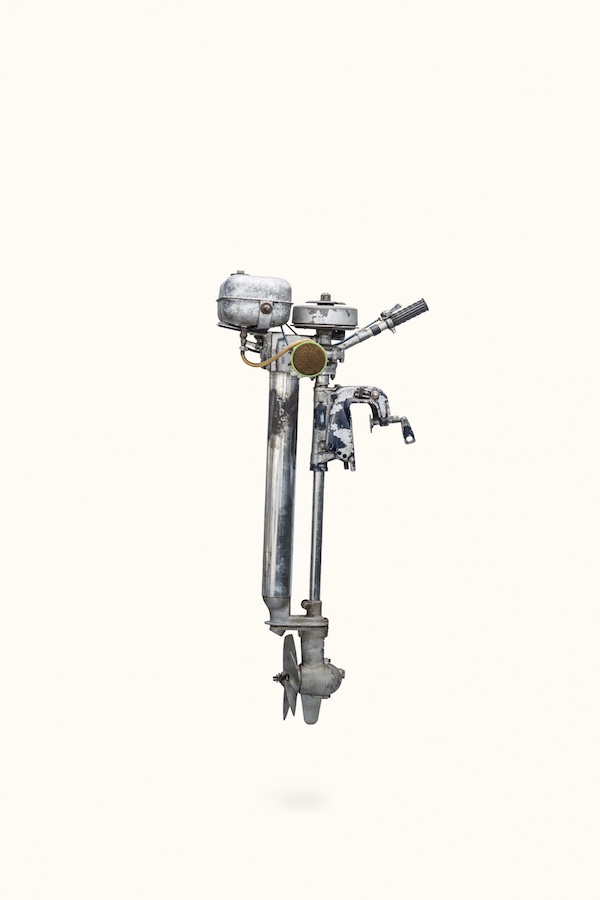
Electrics
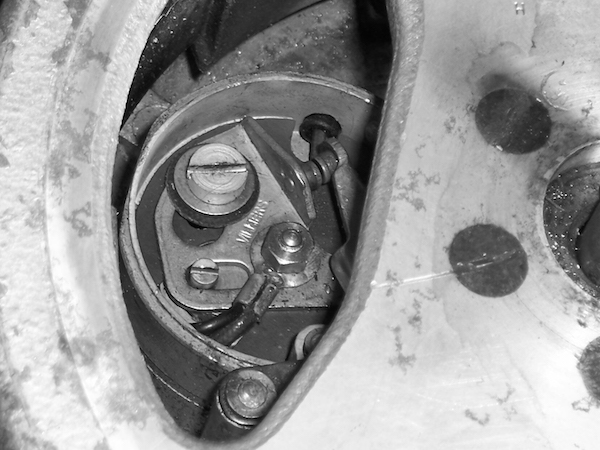
Early electrics are the main source of problems on Seagulls. Up to 1987 all engines had a contact point ‘make or break’ system contained in a small brass-lidded box within the flywheel. A charge was built in the condenser by magnets on the flywheel and when the points opened, the charge fed through the ignition lead. After 1987 the company used a sealed ignition system which rarely gives problems.
The ignition is accessed by removing the domed nut on the top of the flywheel and taking off the flywheel pulley and plate. You should also remove the plug to allow the engine to turn easily. On all engines, the point gap is 0.5mm and is adjusted by slackening the large plate- securing large bolt and twisting an eccentric screw. Rock a small piece of card between the contacts when closed to keep the faces clean.
Replace the covers and test the ignition by spinning it with the plug held against the engine. There should be a clear blue spark (test this out of direct sunlight). The plug should be tan to brown colour. Black oiling or carbon may indicate prolonged slow running, the mixture being too rich or too much two-stroke oil. A white burnt appearance can be caused by the engine running too hot (check the cooling system for blockages), too lean a mixture – either the needle is set too low in the carburettor slide or not enough oil in the fuel.
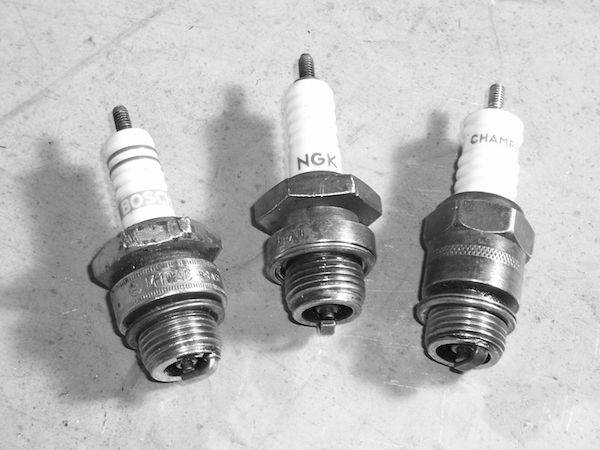
The same size plug will fit all sizes of engine: Champion 10COM, NGK A6 or Bosch M10AC. If everything else is ok but the spark is still weak, try spinning the engine with an electric drill for about five minutes with the plug left out. This will re-magnetise the flywheel.
Parts and advice
For major rebuilds you’ll need a service and parts manual. Metric or AF spanners and sockets do not match the nuts and bolts on Seagulls, for which you need a set of British Whitworth spanners.
For parts and advice, suppliers will need the serial number of your engine which can be found at the top of the crankshaft tube. Sources of parts and advice can be found at www.saving-old-seagulls.co.uk, a website run by John Williams who deserves a medal for the mass of advice and ideas he freely provides. He also keeps a good stock of spares.
Also Sheridan Marine, www.sheridanmarine.com, keeps parts and manuals.
Beyond this we need only heed the words of the British Seagull Outboard Motor Company: Few engines have ever given as little bother and such long and loyal service to thousands upon thousands of owners as the Seagull.
Article from Classic Sailor No7